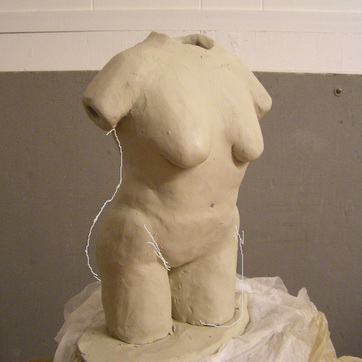
Well, I think we're there! I might bring the neckline down a bit more, it'll all depend on how the coiling works, and there might be a few differences between this and the final piece, but this gives me a good starting point to scale up from. This sketch is 8 inches tall, and about 5 inches across at the arms. The final piece will be built about 22 inches, then it'll shrink in the drying and firing process to about 20 inches tall. Basically the sketch is 1/3rd the size of the finished piece. I'll keep measuring and comparing profiles as I work to make sure I'm on track! Its very easy to get wrapped up in building the motifs then realize I need something else there if I don't pay attention! 
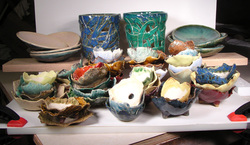
This gives you a glimpse of my process. I'm building small motifs of spirals, little round bits, short chunks of coils, and long coils, then fusing the motif together so its sturdy enough to hold together on its own. Then I place it and fuse it into place! The motif above is a simple double spiral, and below a more involved 1/4 sun. Lots of room to play on this sculpture! I'm planning different feathers, a big tree on the back (wooo, that'll be fun!) a few vines, lots of variations on the spiral... all sorts of stuff! The clay I'm using is a sculpture clay, its a bit courser than I usually use but it'll hold up to what I'm doing much better than the hand-building clay I normally use. This one should fire out a buff color, and I'm planning to finish the outside in a somewhat neutral skin tone with a bit of ash to make it look like a stone sculpture. The inside of the neck will get a colored glaze, something pretty. The contrast should have lots to say! I've already built a bunch of sample swatches out of this clay that I'll use to work out the finish while the actual sculpture is drying. Ok! Now you have a basic idea of what is going on with the coil technique! I'll do updates showing progress as I go along.
4 Comments
I wasn't terribly happy with the last batch of photos I took of this pot earlier, so I changed out the lights in my photo set up. This photo is taken with the old lights, a couple of 'super floods' from GE, which are something I got when a friend moved. She had them as color correcting incandescent bulbs for her make-up mirror, and the bulbs are a blue color and burn VERY hot. Average life expectancy on one of these is listed as 4 hours! She worked on TV for a while, so was very concerned about this, and these bulbs are probably vintage by now! Anyway, they work great for a lot of my colors, but on this little pot... not so much. The actual pot is glazed with a brick red glaze, NOT a bright red as this photo shows. The light level is good, but the color... meh, not really good. I adjust camera a bit and the photos require very little mucking about in photoshop. THIS one is taken with a couple of 100 watt equivalent CFL Ottlights bulbs. I had to tweak the light levels a bit, these just don't put out as much light as the superfloods, but this is a much more accurate color for this pot! So, I just wanted to show how much different lights can affect a photograph! Our eyes and brain usually correct for this, so we don't notice, but the camera doesn't. And these are both 'color corrected' specialty bulbs, not standard bulbs! Standard bulbs would have even more variation between the different types available! Ok, off to go take some more photos! Ok, so I redid the shoulders and arms today, now she needs a bit added to the hips to match the shoulders, or maybe she just needs to be a bit thinner in across the back. It helps sometimes to sit back and look at the pics. Overall though, I'm pretty happy with this for a start. The clay was starting to get TOO stiff where I started (the legs and hips) and too squishy in the shoulders, so I've got her wrapped in a damp towel to even it out some before I go back and work on it some more. The fine muscle details and such really aren't a big concern as the finished piece will be coils, motifs, and more coils and motifs. The SHAPES of the different body parts will show, but not the fine details. This is about 8 inches tall, the final sculpture will be done at about 22 inches, which will fire at about 20 inches. I'm excited! This is a fun project! Even better, I'm getting paid to play! Last week I was contacted by a potential client on Etsy wondering if I'd take custom orders. Well, certainly! A lot of my bonsai pots and planters are custom, sized or glazed for a particular plant or in a color to frame a planting the customer has in mind. This customer asked if I could do a large coiled sculpture in the style of coil work I use in the vases I have up on Etsy. She asked for a female torso, done as large as my kiln will take. I'll admit, I gave her an honest price after estimating my time and looking around at prices on other sculpture pieces at different levels of complexity and I really didn't expect the customer to reply because the price is... well, high. But she went ahead and ordered! So now I'm starting work on it.
I spent the first few days noodling over poses, looking for reference material, and working on other orders that came in before this one. I've still got a bunch of kusamonos (little decorative planters with sort of random shapes and colors, a lot of fun to do!) as well as a LARGE orchid planter (as big around as my kiln will take!) and a bonsai pot that I have to finish! The orchid planter is simple, its just 16 inches across when fired, so it has to start at 18 inches. Clay shrinks as it drys, then shrinks more in the firing process. The bonsai planter is built, drying and just waiting on firing and glazing, and I'll be working on kusamonos whenever I get a handful of scrap clay, just because they keep moving! When I figured out the pose I want, a bit hip-shot but otherwise pretty straightforward, I started working on a 'sketch' out of clay. This piece is coming along very nice! So far I'm happy with the pose and the anatomy is looking nice, although I do want to dig out a reference and adjust a few things. Its done with coils, not the decorative coils, just smoothed so I can get the figure perfected. It'll make a nice piece for the Azalea Festival Art show if nothing else, although it might have to have a fig-leaf or three to keep the pearl-clutchers happy! :) I'll get pics tomorrow, I forgot to grab one today! Here's the latest load from the kiln! About half the kusamonos are for a wholesale order, but the orchid pots (here!) and some of the little planters (here!) are listed. I'm still adding planters though! The green plates will go up soon, although I might decide to do something more with the cream and blue ones on the left. Ok, maybe I'm just having a momentary panic, but the weather here has been decidedly UN-winter this past week! Christmas is done, I had a great trip to San Jose to visit kid and his assorted, as well as nephew and his assorted, and now its back to work. We've had a very dry winter (frighteningly dry, to be honest) and this week its hit the 60's almost every day. I'm TRYING to get pots built for spring replanting season and to fill orders, but they're all a few weeks from sale and now the weather throws THIS at me? ack! I did accomplish one thing this week I'm happy with! I actually gave up on listening to OMIP (the 'oregon medical insurance pool' that the state put together to get those of us who the insurance companies used to sneer at for pre-existing conditions) and their claim that they would 'take care of us' when they FINALLY (after 6 weeks, and a 12 page form filled out) sent a letter saying "oh, by the way, we can't help YOU, but here's a bill if you want to continue our craptastic zuperexpensive insurance until you get something else figured out." An hour or so checking out options online, then 2 minutes filling out a form requesting a call which came half an hour later. Maybe 20 minutes on the phone quizzing the guy about how they handle XY and Z, answer a few (and I MEAN a few, as in 3 or 4) and boom, I now have better insurance at close to HALF THE PRICE of what OMIP was charging. The state can go suck eggs. I didn't even bother with the feds the stories there have been so bad! So, now. I've got a bunch of little pots built, but I've got to get some bigger stuff done! And more little stuff. And bowls, those are coming out very nice so I should work on some of those. BACK TO WORK! There are some projects that just don't play out in real life like they do in my head! This pot was one of those. The customer initially wanted a bonsai pot to specific dimensions and (she thought) in a gray clay with white glaze wiped back to expose the clay in some areas. But she wasn't quite sure so asked me to do some samples in the same clay as the pot. So, I built the pot and half a dozen testers -kusamono pots out of the same clay to try glazes on. Everything went fine, pot was bisqued and set back on the shelf, testers fired in the same load were then glazed with several choices of white. They were all ok, but not exactly right. So, I tried a few more glazes on the testers that were left. Still not right. Ahhh, ok, so I built another round of testers, bringing the number up to an even dozen. Meanwhile, in the middle of all this, the customer ordered 3 more (smaller) pots but in a white clay this time with a white glaze. On the gray clay, I tried a few MORE glazes. And yep, you guessed it, still not really there, although one is close. So, on to yet another batch of testers, using glaze variations of the one color that was close... erm, yeah. No. Those won't work. SO, finally, the customer decides to go with a satin white I used on the 3 smaller pots. Well, all the glaze options that I have that are white... go gray on this gray clay. So I tried something a bit over the edge, and landed on my face. In a rush to get this one done and out the door, I put a coat of a white engobe (which is just a fancy sort of clay slip) with the satin white over without doing any testers. Well, it did some really funky things that WILL work, for something, just not for what the customer wants. The white engobe obviously shrunk more than the clay of the pot, and flaked off in a few areas showing the clay underneath in a pretty strange way. So its back to the drawing board. I'm going to remake this pot, in a white clay this time that will look nice under the satin white giving the final pot a nice slightly warm white. Meanwhile, I'm going to take the scaly pot with all its crackly bits and put another glaze over it, possibly a brown, maybe a green, and rub it into the cracks and over the surface. This pot SHOULD turn out looking like a wonderful antique piece with tons of character! Sometimes people want to know how I come up with an idea. Usually its pretty simple, sometimes it takes a bit of development. One of the projects I've been working on is a simple bowl. The two in the photo are a couple of prototypes I worked out, where I cut a circle out of clay and just draped them over a round ball. Simple, but because there always ends up being texture on the inside surface from the ball, I have to work on smoothing that out without deforming the darn thing. I wanted something different about these, so I decided to leave the bottom rounded on these. They're flat enough they'll be fairly stable, but I want to test them out to see if they're FUNCTIONAL. I might have to add feet or a rim of some sort, but thats a 'we shall see!' So, in this particular case I took and made a bowl and smoothed the OUTSIDE - which is pretty easy as the outside is exposed and the ball supports it so it doesn't deform. That was then bisque fired, and voila, a form! Now all I have to do is cut out my clay, drape it over the bisqued form, and smooth the outside. The inside is already smooth because the clay is pressed against a smooth form. The bisqued clay draws some moisture out of the slab so it sets up pretty quickly. I did a batch of plate/bowls so I could get an estimate of how long it would take, so I'll be able to accurately calculate price, and these will work out in a nice sellable range! The test batch have a texture stamped into the outside and the very lip, so I will use terra sigillata on the outside and an interesting glaze on the inside. Later I'll do a batch and lay a leaf over the form so there will be an imprint in the finished plate! They'll be glazed with a transparent glaze to pop the leaf. It should be fun! Which reminds me, its time to try them out! So, ignore the sloppy stack of boxes (and... other) behind it! BUT... this is most of my part of the last kiln load, the refired stuff plus a few others I ran through before finishing the re-fire. The big orangy brown pot in the corner is a custom order I've been stressing over, trying to get it out so the customer would get it by Thanksgiving, but, um, well... I sort of fell on my face at 5am Sunday after gluing on some cork to protect furniture under it. Then I managed to sleep way past when the USPS truck takes off even though I had my alarms set to get up so I could finish packing. It doesn't help the truck leaves the post office at 11 am, but I finished boxing it up Monday afternoon, then got it in the mail BEFORE the truck took off Tuesday. Turns out USPS "Priority 2 day service" is predicting a SATURDAY delivery in southern California. How does that work? Even if you leave out Thursday (Happy TurkeyDay everyone!) it I would expect 2 day to mean FRIDAY... Sigh, maybe I'll be surprised. Monday shipping would still have meant delivery after the holiday. But seeing as I managed to burn my hands pulling it out of the kiln at midnight Sunday, it is what it is. Anyhow, the tall skinny orchid pot in the background of this one is another custom order, it's supposed to be 10 inches tall by 7 inches wide, in a nice matte blue. The rest of the orchid pots are already listed on Etsy, and the kusamonos will go up soon. The bowls will go up later this week, I'm not totally happy with the interior on one - Rainy Day isn't as pretty as I was hoping for! The trays may or may not go up (they're a clay I don't usually use so they don't go with most of the kusamonos), but I like the way the new forms I used to make them work so I'm going to do more. Well, that was a first! Apparently the power went out somewhere near the end of the firing cycle. So, instead of firing to a good cone 5, it was maybe cone 3. MAYBE. I admit, I rely on the electronic kiln sitter probably more than I should, but I actually had cones in this load on the bottom shelf (coolest, usually) and the cone 4 should have been down, cone 5 touching, and cone 6 just starting to bend. Instead, cone 4 was just starting to bend and the other two were still standing. Top shelf of work looked ok when I peeked, color maybe a touch off on one or two of the matte glazes but everything fluxed. A transparent purpley blue glaze I had on the bottom shelf was just a matte opaque purple, and a couple pots I had down there with the same matte glazes as on the top shelf were very off on color.
Sigh, so, I'm going to have to refire. Everything. Ah well, as kiln disasters go, this is pretty mild, at least its fixable! A few students with purely decorative stuff were anxious to get stuff home (one is leaving the area for months, silly snowbird!) so its probably a GOOD thing I have a small bisque load to run so I can have it done for a customer! Mine will all be refired, I want the quality to be top notch, not 'half-assed'. Biggest issue is I had testers in for a couple glazes I was firing for a customer to look at on a bonsai slab pot thats been sitting for MONTHS.... One of these days we'll get the color nailed down! And of course I forgot to get pics of under-fired glazes before re-firing... |
Maryjane Carlson
Clay has always fascinated me, its many colors and textures, the shapes you can create using it, even the feel of it squishing in my hand. Even after years of playing in the mud I find myself exploring new ideas and I hope my work shows this. Archives
August 2017
Categories
All
|
Life as a potter
OK, so maybe its life as a part time potter! BUT someday that will change!