Anyhow, this was coiled, so it went together pretty easy, then I spent a lot of time smoothing. No warps, its round! Learned a lot doing it, I've not worked this big before! Almost 20 lbs of clay in this thing~I'll have to throw it on the scale and see what finished weight is. But tonight I box it up and off it goes!
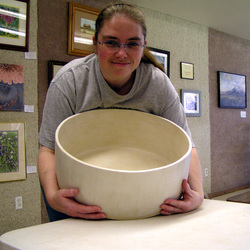
THIS one is finally DONE, it came out nice! This is a custom order from the end of December, 16 inches across and 6.5 inches deep. White clay, satin white glaze. I've decided I hate this glaze, its really more of a cloudy white that really lets things show through. And it shows brush marks, and if you get it too thick it sort of crawls in the firing. Or maybe I just had the pot too smooth.
Anyhow, this was coiled, so it went together pretty easy, then I spent a lot of time smoothing. No warps, its round! Learned a lot doing it, I've not worked this big before! Almost 20 lbs of clay in this thing~I'll have to throw it on the scale and see what finished weight is. But tonight I box it up and off it goes!
4 Comments
Finally, its starting to look like something other than a pile of bits of clay! Here you can see I've done the upper front thighs and the coiling is starting to get interesting. This is about 4 sessions, working for 3 or 4 hours then letting things dry some so it'll be firm enough to support the next session. Next time the first big challenge of the project... BUTTOCKS! I've got to figure a support out and start working on the roundy-out bits. I'm planning to lay out my coils on the inside of a bowl so they'll have the right shape, and making the change in direction is going to be the challenge. Butt it should work out fine! :) Wild plum blossom! The trees are in full bloom here, at least until the next round of rain comes in....
Well, I think we're there! I might bring the neckline down a bit more, it'll all depend on how the coiling works, and there might be a few differences between this and the final piece, but this gives me a good starting point to scale up from. This sketch is 8 inches tall, and about 5 inches across at the arms. The final piece will be built about 22 inches, then it'll shrink in the drying and firing process to about 20 inches tall. Basically the sketch is 1/3rd the size of the finished piece. I'll keep measuring and comparing profiles as I work to make sure I'm on track! Its very easy to get wrapped up in building the motifs then realize I need something else there if I don't pay attention! This gives you a glimpse of my process. I'm building small motifs of spirals, little round bits, short chunks of coils, and long coils, then fusing the motif together so its sturdy enough to hold together on its own. Then I place it and fuse it into place! The motif above is a simple double spiral, and below a more involved 1/4 sun. Lots of room to play on this sculpture! I'm planning different feathers, a big tree on the back (wooo, that'll be fun!) a few vines, lots of variations on the spiral... all sorts of stuff! The clay I'm using is a sculpture clay, its a bit courser than I usually use but it'll hold up to what I'm doing much better than the hand-building clay I normally use. This one should fire out a buff color, and I'm planning to finish the outside in a somewhat neutral skin tone with a bit of ash to make it look like a stone sculpture. The inside of the neck will get a colored glaze, something pretty. The contrast should have lots to say! I've already built a bunch of sample swatches out of this clay that I'll use to work out the finish while the actual sculpture is drying. Ok! Now you have a basic idea of what is going on with the coil technique! I'll do updates showing progress as I go along.
|
Maryjane Carlson
Clay has always fascinated me, its many colors and textures, the shapes you can create using it, even the feel of it squishing in my hand. Even after years of playing in the mud I find myself exploring new ideas and I hope my work shows this. Archives
August 2017
Categories
All
|