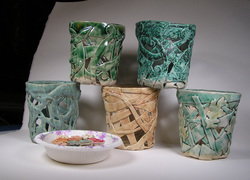
So, this load was mixed, there were a few things that I'll run back through because I'm not happy with the glaze, but there were a bunch of things that came out nice! Here are 5 orchid pots and *counting on fingers* about 140 buttons to list. :) Most of the buttons are finished with various terra sigillata, but there are some nice earthy green ones and some christmas red ones.
0 Comments
Ok, it doesn't look like much, after all it IS just a chunk of floor in a garage, but its a DRY garage, heat-able, and there is actually room I can use around the edges. The shelves are one for drying, one for damp. You can sort of see the stack of stuff behind the shelves that belongs to the boss, but eh, I can share! There is a work sink in the next room, so I'm happy! Now I just need to get cracking! Well, now that the elements are (ALMOST) in I can start thinking about what I'm doing next. First off a test firing. I'll go in and get that last bit done on the install and do the firing tomorrow. I've got half a dozen new orchid pots, some that still need glaze, others that are done, a gazzillion buttons that I'll fire SOME of this time, some next, and a few stray trays and tiles. I need to get some more orchid pots done, though they wont get into this glaze load, but before the end of the month they need built. I also want to get some bonsai pots done before the first of the year for spring replanting, and of course more coil pieces.
NOW I need to get cracking! Ok, just to let all you computer-savvy mudslingers know, Julie decided to cancel the raku this afternoon. Rain is still looking possible at her place, I guess. Anyhoo, tentative rain date is Nov 4, 2012 but starting at noon instead of 2 as we planned for today. I'm gonna go curl up back in bed for a while where its WARM! :)
Did the kiln elements today! Three hours, then I packed it in because I forgot my crimper. I'll have to go back and finish the job, then update this tomorrow! Of course, I forgot that I actually brought my camera until after we had the kiln apart, so this starts with the top ring off and wires all labeled and hanging with the thermocouple out the side of the controller box. Ok, before you begin, check the new elements, make sure you have the right ones. Open the package up, and read the instructions. This kiln has 2 types of elements, a heavier one for the top and bottom, and lighter ones for the center 4 rows.
FIRST step, unplug the kiln. Seems pretty basic, but you know how things go! SECOND step, take the lid off (its held on by a couple of cotter pins and a rod, so easy to remove). THIRD, open up the controller box (this one has 6 screws down the left hand side and hinges on the right), label all the wires so you can replace them, then cut them off as close to the connecter (a little metal dodad that connects the kiln element to a wire) as you can. You can remove all the little porcelain insulators on the pigtails at this point, they're just going to falldowngoboom when you pull the element out anyway. FOURTH (and duh, I didn't do this until the very end, but know better now!) lift the box off and get it out of your way. The hinges are just pegs in a bracket so it really does just lift off. FIFTH unsnap the top ring and remove it. This makes life easier when you have to get to the bottom of this thing. SIXTH find and remove the pins in the haystack. Er, kiln. There should be one in every corner and anywhere the elements bend around a corner. Needle nose pliers are ESSENTIAL for this, even though the instructions say 'helpful.' Silly people. SEVENTH remove the elements carefully so you don't destroy the brick. Pull the pigtail out straight so you don't damage the hole, then gently twist and wiggle til the element comes out. If you have a spot that fights you, check and make sure there is no pin left in there. We missed one, and that was where the element broke as we were pulling. Don't know if the fact that we missed it broke the element or if it was broken before, but whatever. EIGHTH once all the elements are out, vacuum the grooves and bottom of the kiln to get rid of all the accumulated dust. It really helps keep your firings clean so no mystery boogers show up in your glaze. NINTH find the bottom element, take it out and uncoil it. It'll have pre-stretched corners, so all you want to do is just straighten it out gently. Clip off the loops at the end where they wound the pigtails to double thickness. TENTH put the first pigtail through the hole, carefully so you don't enlarge the hole. Watch which end you are starting with, the elements do have different ends, the bends will tell you if you have the top or the bottom end. ELEVENTH carefully work the element into the groove all the way around so the bends line up with the corners and the second pigtail lines up with the second hole. TWELFTH put new pins in, one in each corner between bricks and a few in where ever the elements look loose. These go in to hold down the elements, it'll stretch and sort of flop out of the groove if its not held in place. They should go in at a slight downward angle over the element. Again, needlenose pliers for the win! A GOOD set, mine were a bit worn out and it was a bit of a pain to hold on to the pins. BLEH. REPEAT with each element until you are done. You can start anywhere, as long as the top and bottom elements are in the correct place! OK, now all your elements are in. I've done this twice, and ended up with a pile of extra pins each time, so don't be surprised if you do too. THIRTEEN reassemble the kiln, replacing any rings you have stashed in the other room to get them out of the way. They need elements too. FOURTEEN fit the new porcelain insulators on the pigtails, then pull your pigtails out until the element is snug in the groove. FIFTEEN trim the pigtails to the recommended length. This kiln calls for 5/8 inch. SIXTEEN go find that box you lifted off back in the fourth step and re-hang it on its hinges SEVENTEEN crimp the wires and pigtails together PROPERLY with new crimps. This sort of calls for a crimping tool, they're not too hard to get and work nicely. EIGHTEEN closer er back up, yer done! Well, except for a test fire and such, you want to make sure everything is working properly! Started another bisque load to finish off the last of the stuff for the raku firing.... and now its raining and supposed to rain through the weekend. Sigh. Can't win fer loosing! BUT!!! The new elements arrived today, so I'll put them in tomorrow and get a test run in this weekend.
Oh yeah, filed for unemployment Tuesday. Guess that means I'm looking for work! Sigh, for some reason I want chocolate now... Loaded the kiln and started it, a light load but we need the stuff for our raku firing next weekend. I've got a bunch of buttons (somewhere around 160 buttons!) in, some with 3 different colors of terra sigillata, most just white clay. I used peacock colored (blue green) terra sig, Navajo terra sig (which fires orangish red) and Weststone terra sig (which fires a creamy yellow) and I might just stain them or put a different sig on them for depth. I've also got some orchid pots in, and that's about it.
Got the elements ordered... they should be in soon. I'll probably find out WHEN tomorrow. Started hauling stuff to the new studio space, not much but its started raining so I think I'll be filing for unemployment this week. I'm NOT thrilled, I really did want to get more done on the house but I'm down to a few indoor things and refinishing a dresser. Oh well, I've been figuring the 20th, looks like it might be a few days earlier. I DO have a few hours a week I'll be able to work without ticking off the boss, so I might have to take advantage of that and get the rest of the house done then. SO! I should be done setting up my work space this week, and get some stuff drying so as soon as the elements come in I can get a bunch of stuff done for the shop. Also start working on gallery pieces, and look at making a road trip to galleries. I'll start here in town and see what happens. Signatures for a start, although I don't know if Sandy DOES 3-d. Guess I SHOULD go look! The other thing is the quilt shop here in town, and the one in Crescent City. Maybe even the scrap booking store here in town, I noticed they have some buttons but they're pretty standard plastic buttons. We'll see! Hopefully the kiln elements financing is figured out, I'll find out tomorrow! Meanwhile, back at the ranch, since I AM back at the ranch (went back east for a week or so for a family Thang, Congrats Samantha!) I'm busy building pieces! Cleaned up 125 buttons to go in a bisque (out of 165) this afternoon in pottery but had to quit to make room for the photogs. Ah well, the rest will go pretty quick and then I can get a bunch terra sig'd before firing. Still have a bunch of glazing to do but that'll probably not get fired until we get the elements. I can still bisque though, and I'll have to run a load for the last minute stuff for the raku firing.
Still working the day job, but they're promising rain in a few days, so the end is near! I'm estimating the 20th, then I can play in the mud whenever I want! YAAAAAAAAAAY! I so have short-timers! I've been doing a bit here and there to set up the new studio area, but I'm afraid if I do too much I won't be able to resist the urge to go play in the mud instead of painting! Oh well! Got some more hints on twitter, guess I'll have to give that another look soon, before I forget! LOL What I've BEEN doing there is obviously not going to cut it! Maybe I'll go see if I can check it out tonight, except I'm still exhausted from this weekend family THANG! LOL oh well, a few minutes won't hurt! (Famous Internet Last Words) The passion vine from H*LL has been slowly eating the barn for several years now. The door opening is about 6.5 ft tall, and the vine itself actually extends another 8 or 10 feet across the roof to the right. Where it was trying to climb in my bedroom window! In the second view you can clearly see the head height of the deer. That would be the clear lower area where they've grazed and eaten all the plant. Yes, deer like passion vine. A LOT.... The majority of the vine is now in a pile, although most of the side where the deer have grazed is still attached to the barn. I need to finish separating it from the evergreen clematis, rose, and jasmine it has totally engulfed.
|
Maryjane Carlson
Clay has always fascinated me, its many colors and textures, the shapes you can create using it, even the feel of it squishing in my hand. Even after years of playing in the mud I find myself exploring new ideas and I hope my work shows this. Archives
August 2017
Categories
All
|
Life as a potter
OK, so maybe its life as a part time potter! BUT someday that will change!