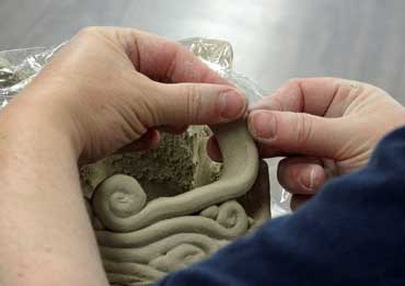
I'll be posting an update on the sculpture soon, but meanwhile this is a blurb from the local arts blog, where they keep up with whats going on in the local art community! Its got some photos of me working on the sculpture showing a view I don't normally get. The photo links to the wildriverscoastart blog (if I can get the darn link to work!). My normal Saturday schedule has me teaching the pottery group Saturday afternoons, and for Art Walk week we clear out of the room early. This week however the Manley Art Center (where the pottery peeps - aka the mudslingers, meet) had no demonstrators and was featuring artists from the Azalea Festival Art Show. So, I stuck around to work on the coiled sculpture, and entertain the mobs while getting work done, with the excuse that I had some stuff displayed from my art show entries. I got a first and a second place ribbon at the art show, but out of a small group of entrants so to me the ribbons were nice, but not... overwhelming, if that makes any sense! _
Its not OVER, not by a long shot though! The 3 week temporary part time job helping a friend of a friend turned out to be an 8 week 50 hours a week job at the end, but that's done. That'll clear out a LARGE block of time to catch up on the stuff I let slide, like the yard that is horribly out of control, restocking the Etsy shop, painting the house I'm care-taking for, and getting a certain sculpture done.
I'll be posting an update on the sculpture soon, but meanwhile this is a blurb from the local arts blog, where they keep up with whats going on in the local art community! Its got some photos of me working on the sculpture showing a view I don't normally get. The photo links to the wildriverscoastart blog (if I can get the darn link to work!). My normal Saturday schedule has me teaching the pottery group Saturday afternoons, and for Art Walk week we clear out of the room early. This week however the Manley Art Center (where the pottery peeps - aka the mudslingers, meet) had no demonstrators and was featuring artists from the Azalea Festival Art Show. So, I stuck around to work on the coiled sculpture, and entertain the mobs while getting work done, with the excuse that I had some stuff displayed from my art show entries. I got a first and a second place ribbon at the art show, but out of a small group of entrants so to me the ribbons were nice, but not... overwhelming, if that makes any sense! _
1 Comment
WELL, now, Weebly went and changed the format for doing things! What a revolting development! Back to the learning curve anyway. SO, where was I (mentally) before getting so rudely interrupted... Ah yes. Did the local 'Artist's Studio Tour' last Saturday, sold one piece, possibly got a few people to come join the Mudslingers, but otherwise a day hanging out making pots in someone else's garage! Ah well, got a bunch done, so no worries there! I've been selling pretty well on Etsy, so that helps. Weather has changed and its definitely getting to be fall, so of course the outdoor painting jobs are ... not. Oh well! This little pot (its about 4 inches across) is up on Etsy now, click on the picture to follow the link and see more photos. I was playing with glazes again, this one is a layer or two of milk and honey with ancient jasper over, and it came out pretty cool, I think. Made a run to Arcata early this week to pick up clay, got 450 pounds worth. Mostly for the Mudslingers, a box for another local potter, and a couple boxes worth for me. A new porcelain and a greyish tan that has a bit of speckle, so I want to PLAY! Instead I've been busy putting listings up, replacing the stuff that sold this month. One of the other things I did was pick up a new thermocouple for the kiln, the latest one is only about a year old, maybe two, and its bending and just ready to be replaced. Its sort of depressing, the original one lasted most of 8 years, I think! Possibly even longer! Anyway, the new one was only $15, so I'll be changing it out before I get the next load in. Th Weee, just torched off the kiln, I've got orchid pots with a few new glazes I'm really excited about- a nice frosted blue that does some really fun crackly stuff where its thick, and an absolutely crazy one that has areas of matte red and gloss brown with hints of purple. I've also got one orchid pot in that's just blue terra sigillata that looks really nice, a nice blue-green that should also do funky things where its thick, and a matte canary yellow.
Also a couple starfish plaques that should be fun! One is designed to wrap a post, the other is flat. These are done with terra sigillata and stains, no glazes, but they should still come out nice. NEXT load should be a bunch of Bonsai pots, two of them are a custom order, the others I'll list on Etsy. Won't be too long, the mudslingers have been busy! Now if I could just convince them to stop ALL channeling tall stuff all at the same time. It makes it really tough to load a kiln and make good use of the space when you've got 3 shelves worth of stuff that needs to go on the top, (oh, yeah, the top of the kiln only holds 2 shelves!) and only another 2 or 3 shelves worth of short stuff to go under the tall stuff! I have ended up firing just over HALF a load the past 2 or 3 firing cycles because stuff is TALL! Oh well, means I've got plenty of room for the shorties! Well, I survived the holidays, although the obligatory round with the plague is still ongoing! We've got a load ready to throw in the kiln tomorrow, bisque stuff, and I'll have a bunch of kusamono pots to go in. These are little 'grass pots' for accent plants such as, well, grass, or other plants to display with bonsai. These make great little decorative planters! This batch are simple textured slabs draped over a form, in this case a tennis ball, with feet added to let them drain. I haven't decided quite yet how I'll finish them, but they're fun to make and I'll have about 10 in this load and at least that in the next, if not more! Also a stray orchid pot, then a bunch of stuff from the rest of the mudslingers. I did one or two pieced ones too, so there's a lot of variation.
Did the kiln elements today! Three hours, then I packed it in because I forgot my crimper. I'll have to go back and finish the job, then update this tomorrow! Of course, I forgot that I actually brought my camera until after we had the kiln apart, so this starts with the top ring off and wires all labeled and hanging with the thermocouple out the side of the controller box. Ok, before you begin, check the new elements, make sure you have the right ones. Open the package up, and read the instructions. This kiln has 2 types of elements, a heavier one for the top and bottom, and lighter ones for the center 4 rows.
FIRST step, unplug the kiln. Seems pretty basic, but you know how things go! SECOND step, take the lid off (its held on by a couple of cotter pins and a rod, so easy to remove). THIRD, open up the controller box (this one has 6 screws down the left hand side and hinges on the right), label all the wires so you can replace them, then cut them off as close to the connecter (a little metal dodad that connects the kiln element to a wire) as you can. You can remove all the little porcelain insulators on the pigtails at this point, they're just going to falldowngoboom when you pull the element out anyway. FOURTH (and duh, I didn't do this until the very end, but know better now!) lift the box off and get it out of your way. The hinges are just pegs in a bracket so it really does just lift off. FIFTH unsnap the top ring and remove it. This makes life easier when you have to get to the bottom of this thing. SIXTH find and remove the pins in the haystack. Er, kiln. There should be one in every corner and anywhere the elements bend around a corner. Needle nose pliers are ESSENTIAL for this, even though the instructions say 'helpful.' Silly people. SEVENTH remove the elements carefully so you don't destroy the brick. Pull the pigtail out straight so you don't damage the hole, then gently twist and wiggle til the element comes out. If you have a spot that fights you, check and make sure there is no pin left in there. We missed one, and that was where the element broke as we were pulling. Don't know if the fact that we missed it broke the element or if it was broken before, but whatever. EIGHTH once all the elements are out, vacuum the grooves and bottom of the kiln to get rid of all the accumulated dust. It really helps keep your firings clean so no mystery boogers show up in your glaze. NINTH find the bottom element, take it out and uncoil it. It'll have pre-stretched corners, so all you want to do is just straighten it out gently. Clip off the loops at the end where they wound the pigtails to double thickness. TENTH put the first pigtail through the hole, carefully so you don't enlarge the hole. Watch which end you are starting with, the elements do have different ends, the bends will tell you if you have the top or the bottom end. ELEVENTH carefully work the element into the groove all the way around so the bends line up with the corners and the second pigtail lines up with the second hole. TWELFTH put new pins in, one in each corner between bricks and a few in where ever the elements look loose. These go in to hold down the elements, it'll stretch and sort of flop out of the groove if its not held in place. They should go in at a slight downward angle over the element. Again, needlenose pliers for the win! A GOOD set, mine were a bit worn out and it was a bit of a pain to hold on to the pins. BLEH. REPEAT with each element until you are done. You can start anywhere, as long as the top and bottom elements are in the correct place! OK, now all your elements are in. I've done this twice, and ended up with a pile of extra pins each time, so don't be surprised if you do too. THIRTEEN reassemble the kiln, replacing any rings you have stashed in the other room to get them out of the way. They need elements too. FOURTEEN fit the new porcelain insulators on the pigtails, then pull your pigtails out until the element is snug in the groove. FIFTEEN trim the pigtails to the recommended length. This kiln calls for 5/8 inch. SIXTEEN go find that box you lifted off back in the fourth step and re-hang it on its hinges SEVENTEEN crimp the wires and pigtails together PROPERLY with new crimps. This sort of calls for a crimping tool, they're not too hard to get and work nicely. EIGHTEEN closer er back up, yer done! Well, except for a test fire and such, you want to make sure everything is working properly! Hopefully the kiln elements financing is figured out, I'll find out tomorrow! Meanwhile, back at the ranch, since I AM back at the ranch (went back east for a week or so for a family Thang, Congrats Samantha!) I'm busy building pieces! Cleaned up 125 buttons to go in a bisque (out of 165) this afternoon in pottery but had to quit to make room for the photogs. Ah well, the rest will go pretty quick and then I can get a bunch terra sig'd before firing. Still have a bunch of glazing to do but that'll probably not get fired until we get the elements. I can still bisque though, and I'll have to run a load for the last minute stuff for the raku firing.
Still working the day job, but they're promising rain in a few days, so the end is near! I'm estimating the 20th, then I can play in the mud whenever I want! YAAAAAAAAAAY! I so have short-timers! I've been doing a bit here and there to set up the new studio area, but I'm afraid if I do too much I won't be able to resist the urge to go play in the mud instead of painting! Oh well! Got some more hints on twitter, guess I'll have to give that another look soon, before I forget! LOL What I've BEEN doing there is obviously not going to cut it! Maybe I'll go see if I can check it out tonight, except I'm still exhausted from this weekend family THANG! LOL oh well, a few minutes won't hurt! (Famous Internet Last Words) Loaded the kiln at the Manley Art Center today, a bisque load. I've got a bunch of orchid pots and some little dipper dishes for sauces and pinches of stuff. A few new twists on the orchid pots, I did this batch with Laguna red clay (some Hawaiian Red and some Red Calico) so these I'll probably just stain with Iron oxide. So far that look has been very popular! a few of them are like I've been doing with triangles and shapes of clay stuck together, but I started with some variations on a few. A few I took the shapes and 'bent' them so the lines are not linear, they're biomorphic and flow around the pot like vines. Thin tips on the triangles are spiraled, and I'm pretty excited about them! A few others are made from a clay that I textured, then painted with contrasting slip before I finished rolling them out. They have a wood texture, highlighted with white (Porcelain) slip. I'm really excited to see if the porcelain pops or fades, but either way it'll add a lot of visual interest on the pots I used it on. I also did some little do-dads with the scraps, a few pendant pieces and a small tray. Weeeee! Forgot I had the camera with me or I'd have taken some before pics!
I also made some plates and a bowl that could end up serving dishes or Ichibana pots, I'm not sure which yet. Fun stuff! |
Maryjane Carlson
Clay has always fascinated me, its many colors and textures, the shapes you can create using it, even the feel of it squishing in my hand. Even after years of playing in the mud I find myself exploring new ideas and I hope my work shows this. Archives
August 2017
Categories
All
|