Whistling Fish Pottery

Life as a potter

OK, so maybe its life as a part time potter!  BUT someday that will change!

Etsy Store
  • Home
  • Gallery
    • Vases
    • Orchid Pots
    • Bonsai Pots
  • Musings of a mad potter
  • Shows and Exhibits

Refired and a few new ones!

11/27/2013

1 Comment

 
Picture
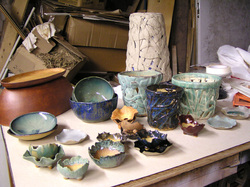
So, ignore the sloppy stack of boxes (and... other) behind it!  BUT... this is most of my part of the last kiln load, the refired stuff plus a few others I ran through before finishing the re-fire.

The big orangy brown pot in the corner is a custom order I've been stressing over, trying to get it out so the customer would get it by Thanksgiving, but, um, well... I sort of fell on my face at 5am Sunday after gluing on some cork to protect furniture under it.  Then I managed to sleep way past when the USPS truck takes off even though I had my alarms set to get up so I could finish packing.   It doesn't help the truck leaves the post office at 11 am, but I finished boxing it up Monday afternoon, then got it in the mail BEFORE the truck took off Tuesday.   Turns out USPS "Priority 2 day service" is predicting a SATURDAY delivery in southern California.  How does that work?  Even if you leave out Thursday (Happy TurkeyDay everyone!) it I would expect 2 day to mean FRIDAY...  Sigh, maybe I'll be surprised.  Monday shipping would still have meant delivery after the holiday.  But seeing as I managed to burn my hands pulling it out of the kiln at midnight Sunday, it is what it is.

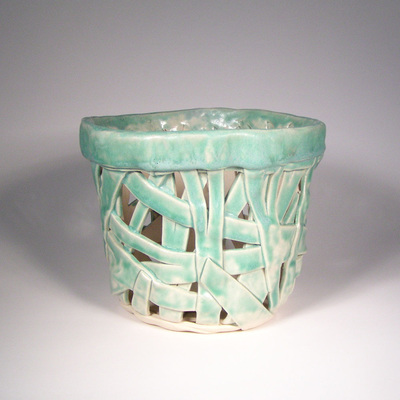
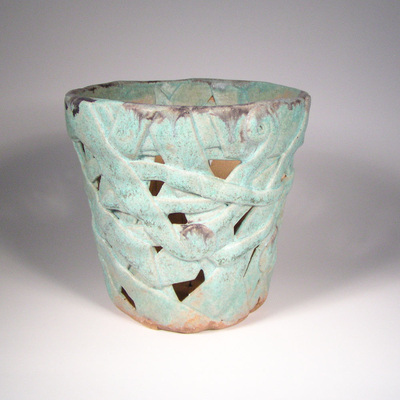
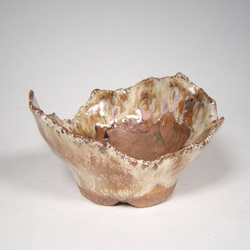
Anyhow, the tall skinny orchid pot in the background of this one is another custom order, it's supposed to be 10 inches tall by 7 inches wide, in a nice matte blue.   The rest of the orchid pots are already listed on Etsy, and the kusamonos will go up soon.  The bowls will go up later this week, I'm not totally happy with the interior on one -  Rainy Day isn't as pretty as I was hoping for!  The trays may or may not go up (they're a clay I don't usually use so they don't go with most of the kusamonos), but I like the way the new forms I used to make them work so I'm going to do more.

1 Comment

Catchup!  

9/28/2013

0 Comments

 
Picture
WELL, now, Weebly went and changed the format for doing things!  What a revolting development!  Back to the learning curve anyway.

SO, where was I (mentally) before getting so rudely interrupted...

Ah yes.  Did the local 'Artist's Studio Tour' last Saturday, sold one piece, possibly got a few people to come join the Mudslingers, but otherwise a day hanging out making pots in someone else's garage!  Ah well, got a bunch done, so no worries there!   I've been selling pretty well on Etsy, so that helps.  Weather has changed and its definitely getting to be fall, so of course the outdoor painting jobs are ... not.  Oh well!

This little pot (its about 4 inches across) is up on Etsy now, click on the picture to follow the link and see more photos.  I was playing with glazes again, this one is a layer or two of milk and honey with ancient jasper over, and it came out pretty cool, I think.    

Made a run to Arcata early this week to pick up clay, got 450 pounds worth.  Mostly for the Mudslingers, a box for another local potter, and a couple boxes worth for me.  A new porcelain and a greyish tan that has a bit of speckle, so I want to PLAY!  Instead I've been busy putting listings up, replacing the stuff that sold this month.  One of the other things I did was pick up a new thermocouple for the kiln, the latest one is only about a year old, maybe two, and its bending and just ready to be replaced.  Its sort of depressing, the original one lasted most of 8 years, I think!  Possibly even longer!  Anyway, the new one was only $15, so I'll be changing it out before I get the next load in.  Th

0 Comments

New Glazes to play with!

3/23/2013

0 Comments

 
Weee, just torched off the kiln, I've got orchid pots with a few new glazes I'm really excited about- a nice frosted blue that does some really fun crackly stuff where its thick, and an absolutely crazy one that has areas of matte red and gloss brown with hints of purple.  I've also got one orchid pot in that's just blue terra sigillata that looks really nice, a nice blue-green that should also do funky things where its thick, and a matte canary yellow.

Also a couple starfish plaques that should be fun!  One is designed to wrap a post, the other is flat.  These are done with terra sigillata and stains, no glazes, but they should still come out nice. 

NEXT load should be a bunch of Bonsai pots, two of them are a custom order, the others I'll list on Etsy.  Won't be too long, the mudslingers have been busy!  Now if I could just convince them to stop ALL channeling tall stuff all at the same time.  It makes it really tough to load a kiln and make good use of the space when you've got 3 shelves worth of stuff that needs to go on the top, (oh, yeah, the top of the kiln only holds 2 shelves!) and only another 2 or 3 shelves worth of short stuff to go under the tall stuff!  I have ended up firing just over HALF a load the past 2 or 3 firing cycles because stuff is TALL! 

Oh well, means I've got plenty of room for the shorties!
0 Comments

Replaced the kiln elements today!

10/21/2012

0 Comments

 
Did the kiln elements today!  Three hours, then I packed it in because I forgot my crimper.  I'll have to go back and finish the job, then update this tomorrow!  Of course, I forgot that I actually brought my camera until after we had the kiln apart, so this starts with the top ring off and wires all labeled and hanging with the thermocouple out the side of the controller box. 


Ok, before you begin, check the new elements, make sure you have the right ones.  Open the package up, and read the instructions.  This kiln has 2 types of elements, a heavier one for the top and bottom, and lighter ones for the center 4 rows.

FIRST step, unplug the kiln.  Seems pretty basic, but you know how things go! 
SECOND step, take the lid off (its held on by a couple of cotter pins and a rod, so easy to remove). 
THIRD, open up the controller box (this one has 6 screws down the left hand side and hinges on the right), label all the wires so you can replace them, then cut them off as close to the connecter (a little metal dodad that connects the kiln element to a wire) as you can.  You can remove all the little porcelain insulators on the pigtails at this point, they're just going to falldowngoboom when you pull the element out anyway.
FOURTH (and duh, I didn't do this until the very end, but know better now!) lift the box off and get it out of your way.  The hinges are just pegs in a bracket so it really does just lift off.
FIFTH unsnap the top ring and remove it.  This makes life easier when you have to get to the bottom of this thing.
SIXTH find and remove the pins in the haystack.  Er, kiln.  There should be one in every corner and anywhere the elements bend around a corner.  Needle nose pliers are ESSENTIAL for this, even though the instructions say 'helpful.'  Silly people.
SEVENTH remove the elements carefully so you don't destroy the brick.  Pull the pigtail out straight so you don't damage the hole, then gently twist and wiggle til the element comes out.  If you have a spot that fights you, check and make sure there is no pin left in there.  We missed one, and that was where the element broke as we were pulling.  Don't know if the fact that we missed it broke the element or if it was broken before, but whatever. 
EIGHTH once all the elements are out, vacuum the grooves and bottom of the kiln to get rid of all the accumulated dust.  It really helps keep your firings clean so no mystery boogers show up in your glaze. 
NINTH find the bottom element, take it out and uncoil it.  It'll have pre-stretched corners, so all you want to do is just straighten it out gently.  Clip off the loops at the end where they wound the pigtails to double thickness. 
TENTH put the first pigtail through the hole, carefully so you don't enlarge the hole.  Watch which end you are starting with, the elements do have different ends, the bends will tell you if you have the top or the bottom end.
ELEVENTH carefully work the element into the groove all the way around so the bends line up with the corners and the second pigtail lines up with the second hole. 
TWELFTH put new pins in, one in each corner between bricks and a few in where ever the elements look loose.  These go in to hold down the elements, it'll stretch and sort of flop out of the groove if its not held in place.  They should go in at a slight downward angle over the element.  Again, needlenose pliers for the win!  A GOOD set, mine were a bit worn out and it was a bit of a pain to hold on to the pins.  BLEH.
REPEAT with each element until you are done.  You can start anywhere, as long as the top and bottom elements are in the correct place!

OK, now all your elements are in.  I've done this twice, and ended up with a pile of extra pins each time, so don't be surprised if you do too.

THIRTEEN reassemble the kiln, replacing any rings you have stashed in the other room to get them out of the way.  They need elements too.
FOURTEEN  fit the new porcelain insulators on the pigtails, then pull your pigtails out until the element is snug in the groove.
FIFTEEN trim the pigtails to the recommended length.  This kiln calls for 5/8 inch. 
SIXTEEN go find that box you lifted off back in the fourth step and re-hang it on its hinges
SEVENTEEN crimp the wires and pigtails together PROPERLY with new crimps.  This sort of calls for a crimping tool, they're not too hard to get and work nicely.
EIGHTEEN closer er back up, yer done!  Well, except for a test fire and such, you want to make sure everything is working properly!
0 Comments

    Maryjane Carlson

    Clay has always fascinated me, its many colors and textures, the shapes you can create using it, even the feel of it squishing in my hand. Even after years of playing in the mud I find myself exploring new ideas and I hope my work shows this.

    Archives

    August 2017
    June 2017
    November 2016
    November 2014
    October 2014
    August 2014
    July 2014
    June 2014
    May 2014
    April 2014
    March 2014
    February 2014
    January 2014
    December 2013
    November 2013
    October 2013
    September 2013
    August 2013
    July 2013
    June 2013
    May 2013
    April 2013
    March 2013
    February 2013
    January 2013
    December 2012
    November 2012
    October 2012
    September 2012
    August 2012

    Categories

    All
    Bonsai
    Coiled Torso Sculpture
    Etsy
    FUN Stuff!
    FUN Stuff!
    Gallery
    Kiln
    Kokedama
    Kusamono
    Life In General
    Manley Art Center
    Mudslingers
    Photographs
    Raku
    Shipping Fun!
    Studio
    Tiles

    RSS Feed

Powered by Create your own unique website with customizable templates.